| Previous chapter: Installing and upgrading Gallery 3 | Back to the user guide main page | Next chapter: Languages |
Gallery 3 consists of two parts: The front end and the back end or admin area.
is what a "normal" user or visitor will see when accessing you Gallery 3 installation. It displays photos, allows to browse through albums, upload pictures etc.
Here are the different areas of the front end:
| 1. Header | 2. Site menu | 3. Main area | 4. Side bar | 5. Footer |
|---|
on the other side is only accessible by admins and allows to configure Gallery 3, add or remove users, install modules, do maintenance etc. To access the admin area logon, then select "Admin" in the site menu and click on the area you want to go to. Non-admins will not see the admin menu. Please be aware that modules can add entries to the admin menu. This document only describes the parts that are available out of the box by Gallery 3.
The Dashboard gives you an overview off your Gallery by displaying e.g. newest photos, log entries etc. You can customize the Dashboard by adding (menu in the top right), removing (little "x" at the top right of any part of the dashboard) and moving (drag and drop) parts of the dashboard.
The settings menu item gives 4 main sub-cathegories:
Here is where you enable/disable any module you want to use in your gallery. Every module adds further functionality to G3. To read more on modules, please go to the modules part of this user guide.
This area allows you to add new users and new groups, edit/remove existing ones and place them into groups. Grouping allows you to give access for different albums to certain groups. Moving users to groups is as easy as drag and drop from the users list to the group box.
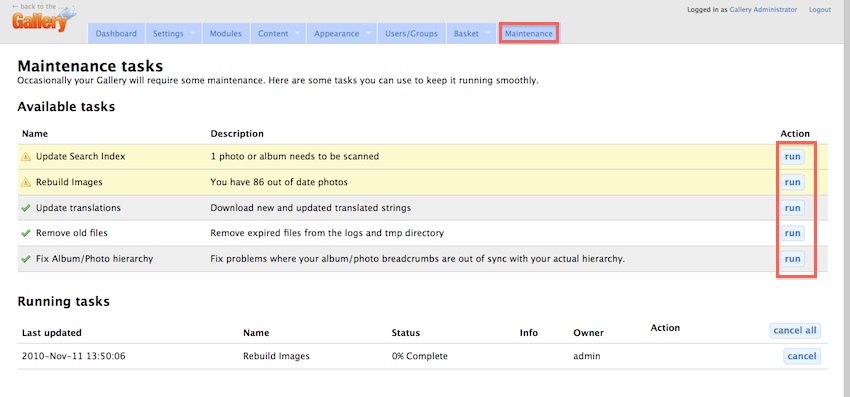
To run maintenance you need to go to the Admin area and click in the main menu on Maintenance. This will open a page where you can see if the gallery needs any maintenance. The yellow parts need to run so that your gallery is up to date. This can be seen in the following screenshot:

| Previous chapter: Installing and upgrading Gallery 3 | Back to the user guide main page | Next chapter: Languages |