IMPORTANT NOTES
The emboss module may not play well with the KeepOriginal module
- Both modules attempt to protect the fidelity of your uploaded photos by saving off a copy of the original in a safe location. But, this means that one of the two modules may be saving off a copy rather than the original. If that copy has been modified by adding an overlay (emboss) or rotating it (KeepOriginal), then the other module will not truly have saved off the original artwork. Later, when it attempts to restore the original, it could clobber the true original with a modified copy!
- I strongly advise running Gallery3 with both of these modules active at the same time
What NOT to do if you're having difficulties
- I recently received a comment from someone who tried to use emboss, couldn't figure it out, and deciding all was lost, deleted everything in his gallery and had the web admins rebuild his database. Don't do this without letting me try to help you first!
- Emboss goes to great length to squirrel away your original artwork in a side folder so that it can be restored. In addition, the only database tables it modifies are the ones it creates. If you cannot back out undesired changes on your own after reading through the "Uninstalling" section below, PLEASE contact me by email before doing anything rash. There are periods I go a day or two without checking email. Do not assume I'm blowing you off if I don't get back to you within 24 hours.
Emboss
A different kind of watermarking module.
Description
This module provides an alternative to the watermark module found in core Gallery3.
The key advantages of emboss
- All image sizes are embossed (not just resize and thumbnails)
- Different overlays can be used for different sized images (it does not force the same size overlay on everything)
To avoid any confusion, let me clarify that this module does not create an embossing in the strict sense of the word (i.e. it doesn't take a black/white image and create a bump/depression based on that image). It composites a secondary image on top of your primary image with a user specified location and degree of transparency. I am reluctant to refer to this as "watermarking" as I want to avoid confusion between this module and the module named watermark, but in all reality that is what this module does.
Bug Reports
@todo EMPTY_INPUT_FILE
- I received the following comment on the codex forum
When I try this I get the following error message @todo EMPTY_INPUT_FILE.
- Unfortunately, I have not yet received any addition log/debug information and cannot recreate the problem. Please let me know if you encounter this problem as well so that I can help debug/fix the problem. If you could take the following steps, it will help me debug the problem quicker:
- Swap out your current emboss module with the debug version
- Dump a debug log (from the Content->Emboss) admin menu
- Send me the file output into your gallery/var/logs directory.
Screen shots

Installation
- Download the module from here or from git.
- To install, extract the "emboss" folder from the zip file into your Gallery 3 modules folder.
- To activate it, log into your Gallery web site as an administrator and activate the module in the Admin -> Modules menu.
- To configure it, follow the instructions below.
Configuration
If you have a gallery with a lot of images, the initial configuration may take some time and will essentially double your hard drive footprint. All of the images must be backed up (i.e. a copy created) when the module is first activated. Once the overlays have been uploaded and activated, a maintenance task will need to be kicked off to modify your images (copies) with the appropriate overlay. As a frame of reference, my gallery contains roughly 300 images and takes around 5 minutes for the maintenance task to run.
To configure the emboss module, log into your Gallery web site as an administrator and navigate to the Admin -> Content -> Emboss menu.
- If you don't see the Emboss menu, make sure that you have activated the module (under the Admin->Modules)
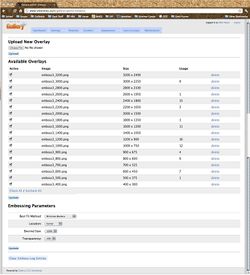
Overlays
- Before you can begin using the emboss module, you must first upload one or more overlay images. These overlays may simply be rescaled versions of the same image, they could be completely different. The only requirement on them is that no two have the same dimensions.
- Reasons you may want to use different overlays include (but are not limited to):
- Different overlays for landscape and portrait orientations
- Increased level of detail in the overlay for larger images
- Including size based (e.g. pricing) information in the overlay
- The "correct" overlay for any given photo is chosen from the list of active overlays based on a number of metrics
- The dimensions of the chosen overlay will never exceed the maximum allowable size.
- The maximum dimensions are set to the product of the actual photo dimensions and the "desired size" module setting (see below)
- The best overlay is chosen based on the "best fit method" module setting (see below)
- Maximize Overlay Area simply picks the overlay with the largest area
- Minimize Borders picks the overlay with the smallest sum of squares of "excess" width and "excess height"
- Aspect Ratio Weighted uses a formula that attempts to balance the desire to use an overlay whose aspect ratio is closest to that of the photo and the desire to use as large an overlay as allowed by the max size
- (in practice, I haven't found much difference between this and the minimize borders method for any photo of a reasonable aspect ratio)
- Note that you must hit the "upload" button to actually upload the file. The "update" button only applies to the settings fields.
- Currently, you can only upload one overlay at a time. It is on my "todo" list to add upload of multiple overlays in one action, but I have not yet gotten to that.
Embossing Parameters
- While I believe that I set the initial parameters to reasonable values, you may very well wish to customize the appearance to your particular taste. There are currently 4 parameters that control which overlay is selected and how it is applied to the photos:
-
- See Overlays above for more information on how each possible value affects overlay selection
- Assuming that the overlay is smaller than the photo, this setting controls where the overlay should be anchored within the photo. The 9 posible values are "center" and each of the 8 primary compass directions.
- (If you really don't understand this, just try it out to see the effect.)
- Sets the maximum dimensions of the selected overlay based on selected percentage of the photos actual dimensions. Possible values range from 5-100% in increments of 5%. Note that this percentage refers to each of the two linear dimensions (width and height) and not percentage of image area. (See Overlays above for more information.)
- Affects how the overlay is composited over the photo. A transparency of 0% means that the overlay will be fully opaque (i.e. you cannot see through any non-transparent parts of it). A transparency of 100% means that the overlay will be fully transparent (i.e. you cannot see the overlay at all). Possible values range from 0-90% in increment 10%.
- Note that if your overlay contains transparency (must be gif or png), the original image will show through fully regardless of the value of this setting (this is most likely what you want).
Log Cleanup
- This module tends to add a lot of entries in your history log. I added a button at the bottom of the emboss settings page to purge all entries from the log that were generated by this module.
Uninstalling
If, after trying emboss out, you decide it's not giving you the results you were hoping for, backing out your work should not be difficult.
-
- Go to the Admin > Content > Emboss page
- Deselect all of your overlays
- Hit the "Update" button (there are two of them... they do the same thing)
- Update your images to remove the overlays
- Go to the Admin > Maintenance page
- Run the emboss maintenance task to remove all overlays
- Go the the Admin > Modules page
- Deselect emboss
- Hit the "Update" button
- Optional: Remove the emboss database tables
- Find and remove the following two table only
- g3_emboss_overlays
- g3_emboss_mappings
- If you do this and hope to use emboss again at a later date, you must also "trick" gallery into thinking it had never installed emboss before so that it will actually rebuild these two tables the next time you activate it. This gets a little dicey and is why I mark this section as optional. You will need to find the emboss entry in the g3_modules and delete it. Again, that is delete only the emboss module entry, NOT the entire g3_modules table.
Discussion
There are currently two threads on the Gallery Forums discussing the emboss module.
- The primary discussion thread is: 105339
- A secondary thread can be found at 105236.
- The bug report mentioned above can be found here
Examples
The following two Gallery3 based sites are currently using the emboss' module. Feel free to check them out.
If you would like to see your site mentioned here, please let me know (or feel free to add it yourself if you have edit permission)
Implementation Details
Emboss works by making side copies of all original artwork. These copies are never modified. When changes need to be made in how an emboss overlay is applied to a photo, a new copy of the original is created in your album. The overlay is applied to this new copy in your album.
- The safe originals are kept in a directory gallery/var/originals. The structure of this directory is kept perfectly in sync with the gallery/var/albums directory
- When an item (photo or album) is moved to a new location, this move is mirrored in the originals directory. (item_moved event)
- When an item (photo or album) is renamed, the corresponding item in the originals directory is renamed accordingly. (item_updated event)
- When a photo is added to your gallery, a copy is made into the originals directory before any changes are made to it. (item_created event)
- (note that this is the "weak point" of the process. If another module catches this event first, emboss will copy any changes made by that module, not necessarily what was actually uploaded)''
- When a photo is deleted from your gallery, the copy in the originals directory is also deleted. ("item_deleted event")
- The "correct" overlay is chosen from the list of active overlays based on a number of metrics
- Overlay selection is reevaluated whenever the module settings are updated or a new overlay uploaded
- The max overlay dimensions are set to the product of the actual photo dimensions and the "desired size" module setting.
- The dimensions of the correct overlay will never exceed this max size.
- The best overlay is chosen based on the "best fit method" module setting.
- Maximize Overlay Area simply picks the overlay with the largest area (that doesn't exceed the max size)
- Minimize Borders picks the overlay with the smallest sum of squares of "excess" width and "excess height")
- Aspect Ratio Weighted uses a formula that attempts to balance the desire to use an overlay whose aspect ratio is closest to that of the photo and the desire to use as large an overlay as allowed by the max size
- In reality, I haven't found much difference between these methods for any photo of a reasonable aspect ratio.
- Two database tables are required to keep everything up-to-date
- g3_emboss_overlays keeps track of your available overlays, their size, and their current status (active or inactive)
- g3_emboss_mappings keeps track of which overlay should be applied to each photo and the current overlay, position, and transparency settings of the photo in the albums directory.
- A maintenance task is created (and the site_status updated) whenever there exists in the album one or more photos with the "wrong" overlay, position, or transparency.
Similar module
Gallery2:Modules:watermark

